Authenticate your React App with Firebase in 2023
Crafting a simple react-app and authenticating it with firebase


Table of contents
- Outlines
- Requirements
- Setting up your React App with Vite
- Arranging the folder structure for the app
- Setting up Tailwind in the App
- Implementing routes in our application
- Setting up react-router-dom
- Implementing Routes
- Creating necessary Components
- Why is user authentication important?
- Getting started with Firebase
- Installing Firebase
- Adding SDKs to our React app
- Getting Started With Authentication
- Adding Google provider
- Adding Email/Password native providers
- Configuring authorized domains
- What is Cloudstore ?
- Enabling CloudStore
- Creating a collection for the document
- Finalizing the App Authentication
- googleSignin function
- loginEmailAndPassword function
- signUpEmailAndPassword Function
- implementation for the signUp component
- Implementation for the reset component
- Conclusion
Hi there, are you looking to know how to secure your react app with firebase, then this article is for you. In this article, I will show you how to authenticate your React apps using Firebase in 2023.
Outlines
Requirements/Prerequisites for authentication with Firebase
Vite (a better alternative to create-react-app).
Setting up your React App
Styling with tailwind css
Why is user authentication important?
What is Firebase
Setting up Firebase
Integrating Firebase into our App
Creating a database with cloud firestore
Finalizing the App authenication
Requirements
NodeJS installed. if you don't have it installed, you can get it from here
A code editor like Vscode
A Google account to use Firebase
Basic knowledge of React, React-Router-dom and useContext hook
Setting up your React App with Vite
You will be using Vite to create the React app. Vite is a faster and more lightweight alternative to Create React App. Here's how you can set up a new React app using Vite:
Make sure you have Node.js installed on your system. If you don't have it installed, you can download it from the official Node.js website here and follow the installation instructions.
Open your terminal or command prompt.
Install
Viteglobally on your system using npm by typing this command in your terminal belownpm install -g create-vite
4. Create a new React app using Vite:
Replace react-firebase-auth with the desired name of your application. The --template react flag tells Vite to use the React template.
create-vite auth-app --template react
5. Change the directory to the newly created app
cd auth-app
6. Install the app's dependencies: now run this command for installing your app dependencies which include react-firebase-hooks
npm install react-firebase-hooks
- Start the development server:
npm run dev
Vite will launch the development server, and your React app will be available at http://127.0.0.1:5173 by default.

Now, If you see this image on your screen, you have a new React app created with Vite, and you can start building your application.
Arranging the folder structure for the app
After launching the app with Vite, you do a clean-up and set up your folder structure.
Clean-up of the app
React installation normally comes with some default files that won't be needed moving forward, so removing them and starting on a clean slate is best. App.css should be deleted from the src folder. Clean up the App.js file too and make sure it looks like this:
function App() {

  return (
    <>

    </>
  )
}

export default App
After cleaning up, arrange and set up the folder structure you will use in the app.
So in the src directory, you are left with your App.js and main.jsx file, Next, install tailwind css which you will be using to style your app.
Setting up Tailwind in the App
If you want to know more about tailwind, you can click here to learn more about the documentation.
To install Tailwind CSS, follow the following steps:
First, Install the required packages on your terminal.
npm install -D tailwindcss postcss autoprefixerCreate a configuration file for your project. To generate this default configuration, you can run:
npx tailwindcss init -pThis will create a
tailwind.config.jsandpostcss.config.jsfile in your project root directory.Create a file named
index.cssin thesrc directoryand add the@tailwinddirectives for each of Tailwind’s layers to the file:@tailwind base; @tailwind components; @tailwind utilities;Add the paths to all of your template files in your
tailwind.config.jsfile:/** @type {import('tailwindcss').Config} */ module.exports = { content: ["./src/**/*.{html,js,jsx}"], theme: { extend: {}, }, plugins: [], }Next, re-run the following command again to start your
ViteappVitewill launch the development server, and your React app will be available at http://127.0.0.1:5173 by default:npm run dev
Implementing routes in our application
Since you are building a multi-page application, users that visit your app will be redirected to the user page after successful registration. For this functionality, you will be using react-router-dom.
Setting up react-router-dom
Install React Router:
npm install react-router-dom
With the project set up and React Router installed, you can now start building your multi-page application!
Implementing Routes
In a multi-page application, you will define routes that map specific URLs to different components. These components will be rendered when the corresponding route is accessed. Open the src/main.jsx file and start by importing the necessary modules:
import React from 'react'
import ReactDOM from 'react-dom/client'
import App from './App.jsx'
import './index.css'
import {BrowserRouter} from "react-router-dom"

ReactDOM.createRoot(document.getElementById('root')).render(
  <React.StrictMode>
  <BrowserRouter>
    <App />
  </BrowserRouter>
  </React.StrictMode>,
)
Next, open your src/App.jsx and define routes inside the App component like this
import {Route, Routes} from "react-router-dom"
import Register from "./Register"
import Login from "./Login"
import User from "./User"
import Reset from './Reset'

function App() {

  return (
    <>
      <Routes>
        <Route path="/" element={<Login/>}/>
        <Route  path="/Register" element={<Register/>}/>
        <Route path="/user" element={<User/>}/>
        <Route path="/reset" element={<Reset/>}/>
      </Routes>
    </>
  )
}

export default App
Creating necessary Components
You will be creating four components in the react app and they will be:
Login Component
Register Component
User Component
Reset-page Component
For the Login component, create a file named login.jsx file in the src directory and paste this:
import React from "react"
import { Link } from "react-router-dom"

export default function Login() {
    return (
      <>
        <div className="flex min-h-full flex-1 flex-col justify-center px-6 py-12 lg:px-8">
          <div className="sm:mx-auto sm:w-full sm:max-w-sm">
            <h2 className="mt-10 text-center text-2xl font-bold leading-9 tracking-tight text-gray-900">
              Sign in to your account
            </h2>
          </div>

          <div className="mt-10 sm:mx-auto sm:w-full sm:max-w-sm">
            <form className="space-y-6" action="#" method="POST">
              <div>
                <label htmlFor="email" className="block text-sm font-medium leading-6 text-gray-900">
                  Email address
                </label>
                <div className="mt-2">
                  <input
                    id="email"
                    name="email"
                    type="email"
                    autoComplete="email"
                    required
                    className="block w-full rounded-md border-0 py-1.5 text-gray-900 shadow-sm ring-1 ring-inset ring-gray-300 placeholder:text-gray-400 focus:ring-2 focus:ring-inset focus:ring-indigo-600 sm:text-sm sm:leading-6"
                  />
                </div>
              </div>

              <div>
                <div className="flex items-center justify-between">
                  <label htmlFor="password" className="block text-sm font-medium leading-6 text-gray-900">
                    Password
                  </label>
                  <div className="text-sm">
                    <a href="#" className="font-semibold text-indigo-600 hover:text-indigo-500">
                      Forgot password?
                    </a>
                  </div>
                </div>
                <div className="mt-2">
                  <input
                    id="password"
                    name="password"
                    type="password"
                    autoComplete="current-password"
                    required
                    className="block w-full rounded-md border-0 py-1.5 text-gray-900 shadow-sm ring-1 ring-inset ring-gray-300 placeholder:text-gray-400 focus:ring-2 focus:ring-inset focus:ring-indigo-600 sm:text-sm sm:leading-6"
                  />
                </div>
              </div>

              <div>
                <button
                  type="submit"
                  className="flex w-full justify-center rounded-md bg-indigo-600 px-3 py-1.5 text-sm font-semibold leading-6 text-white shadow-sm hover:bg-indigo-500 focus-visible:outline focus-visible:outline-2 focus-visible:outline-offset-2 focus-visible:outline-indigo-600"
                >
                  Sign in
                </button>
              </div>
            </form>

            <p className="mt-10 text-center text-sm text-gray-500">
              Don't have an account?{' '}
              <Link to={"/Register"} className="font-semibold leading-6 text-indigo-600 hover:text-indigo-500">
                Register Here
              </Link>
            </p>
          </div>
        </div>
      </>
    )
  }
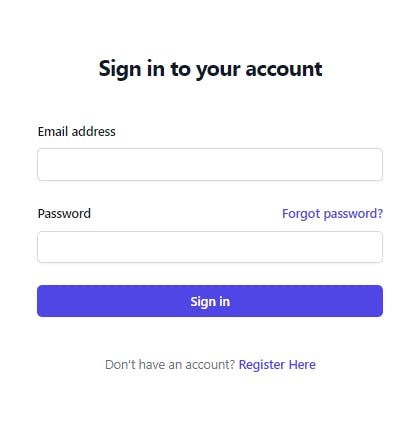
it will look like so for the login page
Register Page
For the Register Page, create a file named Register.jsx in the src directory and paste this
import React from "react"
import { Link } from "react-router-dom"

export default function Register() {
    return (
      <>
        <div className="flex min-h-full flex-1 flex-col justify-center px-6 py-12 lg:px-8">
          <div className="sm:mx-auto sm:w-full sm:max-w-sm">
            <h2 className="mt-10 text-center text-2xl font-bold leading-9 tracking-tight text-gray-900">
              Register in to your account
            </h2>
          </div>

          <div className="mt-10 sm:mx-auto sm:w-full sm:max-w-sm">
            <form className="space-y-6" action="#" method="POST">
            <div>
                <label htmlFor="email" className="block text-sm font-medium leading-6 text-gray-900">
                 First Name
                </label>
                <div className="mt-2">
                  <input
                    id="email"
                    name="email"
                    type="email"
                    autoComplete="email"
                    required
                    className="block w-full rounded-md border-0 py-1.5 text-gray-900 shadow-sm ring-1 ring-inset ring-gray-300 placeholder:text-gray-400 focus:ring-2 focus:ring-inset focus:ring-indigo-600 sm:text-sm sm:leading-6"
                  />
                </div>
              </div>
              <div>
                <label htmlFor="email" className="block text-sm font-medium leading-6 text-gray-900">
                 Last Name
                </label>
                <div className="mt-2">
                  <input
                    id="email"
                    name="email"
                    type="email"
                    autoComplete="email"
                    required
                    className="block w-full rounded-md border-0 py-1.5 text-gray-900 shadow-sm ring-1 ring-inset ring-gray-300 placeholder:text-gray-400 focus:ring-2 focus:ring-inset focus:ring-indigo-600 sm:text-sm sm:leading-6"
                  />
                </div>
              </div>
              <div>
                <label htmlFor="email" className="block text-sm font-medium leading-6 text-gray-900">
                  Email address
                </label>
                <div className="mt-2">
                  <input
                    id="email"
                    name="email"
                    type="email"
                    autoComplete="email"
                    required
                    className="block w-full rounded-md border-0 py-1.5 text-gray-900 shadow-sm ring-1 ring-inset ring-gray-300 placeholder:text-gray-400 focus:ring-2 focus:ring-inset focus:ring-indigo-600 sm:text-sm sm:leading-6"
                  />
                </div>
              </div>

              <div>
                <div className="flex items-center justify-between">
                  <label htmlFor="password" className="block text-sm font-medium leading-6 text-gray-900">
                    Password
                  </label>
                  <div className="text-sm">
                    <Link to="/reset" className="font-semibold text-indigo-600 hover:text-indigo-500">
                      Forgot password?
                    </Link>
                  </div>
                </div>
                <div className="mt-2">
                  <input
                    id="password"
                    name="password"
                    type="password"
                    autoComplete="current-password"
                    required
                    className="block w-full rounded-md border-0 py-1.5 text-gray-900 shadow-sm ring-1 ring-inset ring-gray-300 placeholder:text-gray-400 focus:ring-2 focus:ring-inset focus:ring-indigo-600 sm:text-sm sm:leading-6"
                  />
                </div>
              </div>

              <div>
                <button
                  type="submit"
                  className="flex w-full justify-center rounded-md bg-indigo-600 px-3 py-1.5 text-sm font-semibold leading-6 text-white shadow-sm hover:bg-indigo-500 focus-visible:outline focus-visible:outline-2 focus-visible:outline-offset-2 focus-visible:outline-indigo-600"
                >
                  Register
                </button>
              </div>

              <div className="text-sm flex flex-row gap-5">
                 <p>Already have an account? </p>
                    <Link to="/" className="font-semibold text-indigo-600 hover:text-indigo-500">
                      Login
                    </Link>
                  </div>
            </form>
          </div>
        </div>
      </>
    )
  }
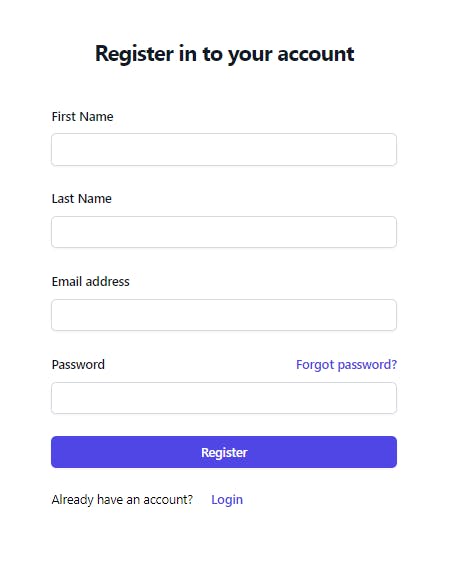
Here is what it looks like
User Page
For the User Page, create a file named User.jsx in the src directory and paste this
import React, { useEffect, useState } from 'react'

const User = () => {

  return (
    <div className='flex flex-col justify-center items-center border border-[#e2e0e0] mx-10 mt-10 lg:mx-[250px] py-10'>
    <div className='flex flex-row justify-center items-center gap-6'>
     <p>Logged in as <span className='text-blue-500 font-bold'></span></p>
    </div>
    <button className='bg-blue-500 rounded-md px-3 py-2'>
      Sign Out
    </button>
    </div>
  )

}

export default User
Reset Page
For the Reset Page, create a file named Reset.jsx in the src directory and paste this
import React from "react"
import { Link } from "react-router-dom"


export default function Reset() {
    return (
<div className="flex min-h-full flex-1 flex-col justify-center px-6 py-12 lg:px-8">
          <div className="sm:mx-auto sm:w-full sm:max-w-sm">
            <h2 className="mt-10 text-center text-2xl font-bold leading-9 tracking-tight text-gray-900">
              Reset your account
            </h2>
          </div>

          <div className="mt-10 sm:mx-auto sm:w-full sm:max-w-sm">
            <form className="space-y-6">
              <div>
                <label htmlFor="email" className="block text-sm font-medium leading-6 text-gray-900">
                  Email address
                </label>
                <div className="mt-2">
                  <input
                    id="email"
                    name="email"
                    type="email"
                    className="block w-full rounded-md border-0 py-1.5 text-gray-900 shadow-sm ring-1 ring-inset ring-gray-300 placeholder:text-gray-400 focus:ring-2 focus:ring-inset focus:ring-indigo-600 sm:text-sm sm:leading-6"
                  />
                </div>
              </div>
                <button
                  type="submit"
                  className="flex w-full justify-center rounded-md mb-4 bg-indigo-600 px-3 py-1.5 text-sm font-semibold leading-6 text-white shadow-sm hover:bg-indigo-500 focus-visible:outline focus-visible:outline-2 focus-visible:outline-offset-2 focus-visible:outline-indigo-600"
                >
                 Reset
                </button>
            </form>

            <p className="mt-10 text-center text-sm text-gray-500">
              Don't have an account?{' '}
              <Link to={"/Register"} className="font-semibold leading-6 text-indigo-600 hover:text-indigo-500">
                Register Here
              </Link>
            </p>
          </div>
        </div>
)
}
Here is what it will look like

Why is user authentication important?
Around 33 billion account breaches are predicted to occur in 2023. Cyberattacks are becoming increasingly sophisticated, causing devastating consequences: financial and personal data loss.
Users need protection on the Internet, and user authentication is one of the most important cybersecurity bastions. It protects sensitive information and prevents unauthorized access to systems and data.
What is Firebase?
In simple words, Firebase is a software development platform that helps in building web and mobile applications with its 18 services. These 18 services of this BaaS solution also include purposeful APIs and four beta products. In addition, it is compatible to integrate with Android, web, iOS, and Unity setups.
Importance of Firebase
Firebase provides many unique features and functionalities that make it more than just a tool for authentication. Here are some of them
Google Analytics: Although Google Analytics is a free tool provided by Google but its integration becomes seamless when you work with Firebase. Google Analytics is compatible with iOS, Android, Web, C++, and Unity setups. This free analytic solution reports to the developers how users are behaving toward their mobile and web applications.
Secure and fast hosting services: Another appealing advantage of Firebase is its secure & fast hosting services. Firebase hosting supports all content types, including web applications, dynamic and static content. Moreover, whether you want to host your Express.js microservices, HTML, CSS, or APIs, the hosting support of Firebase is always there. .
Scalability: Though Firebase’s Realtime Database is capable of scaling, things will start to get crazy when you app becomes really popular or if your database becomes really massive.
Getting started with Firebase
To continue with this tutorial, you need an account with Firebase!. Create one on the Firebase website using your email address, Google account.
Create a Project
Click on Create a Project as shown in the image below

- Give your project a title name
Make sure you give yourProjecta title name and then presscontinuebutton as shown in the image below:
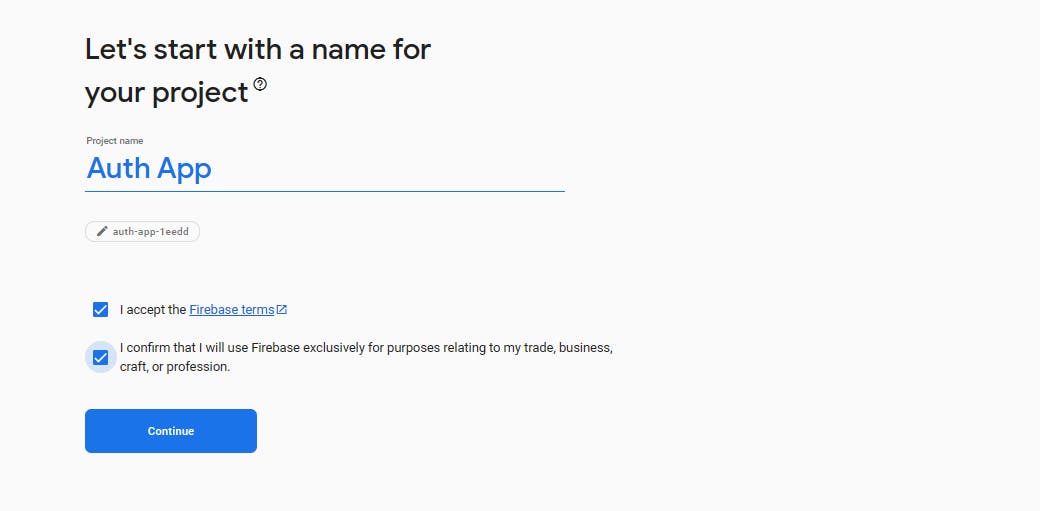
3. Give your project a title name, you will be navigated to the page where you will presented a choice to enable google analytics, but it's not a necessity for this tutorial. So press continue as shown in the image

- Accept the Google Analytics terms
Next, accept google analytics and click oncreate project

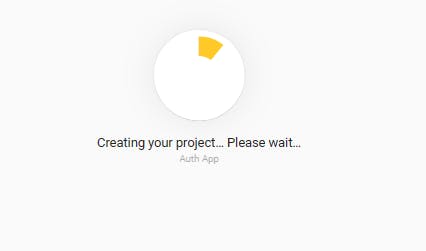
5. Creation of Project
Now your Project get created, so wait till the process is done.
- Click on the web icon to get started with installing firebase in our app:
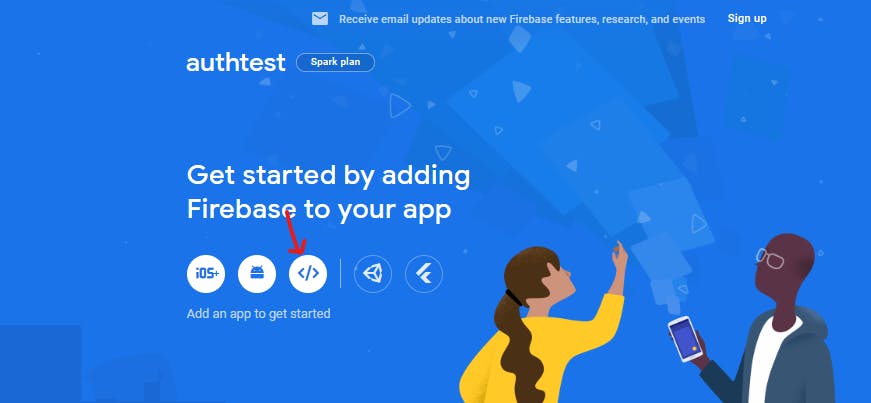
Installing Firebase
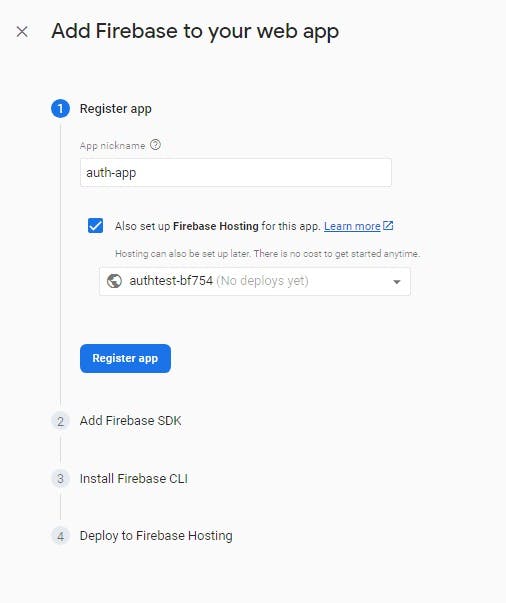
Here, Add firebase to your app by following this steps:
- Give your app a nickname like auth-app. Next, set up firebase-hosting and then select the default site for deployment.
Next, click the register app button:
- Now go to your terminal, then install firebase using this command:
npm install firebase

Adding SDKs to our React app
SDKs are needed so that you can connect firebase to your application. Follow these steps to connect firebase:
1. Create a config.js file in your src directory and copy your functions you need from the SDKs like this
const firebaseConfig = {
  apiKey: "AIzaSyDK3AMzW3KgtR0dTOxwF6a5FiiOdUN3m6k",
  authDomain: "auth-app-1eedd.firebaseapp.com",
  projectId: "auth-app-1eedd",
  storageBucket: "auth-app-1eedd.appspot.com",
  messagingSenderId: "933857762305",
  appId: "1:933857762305:web:f461dbf6bf14cf38ca7400",
  measurementId: "G-YM6PQ3XPMJ"
};
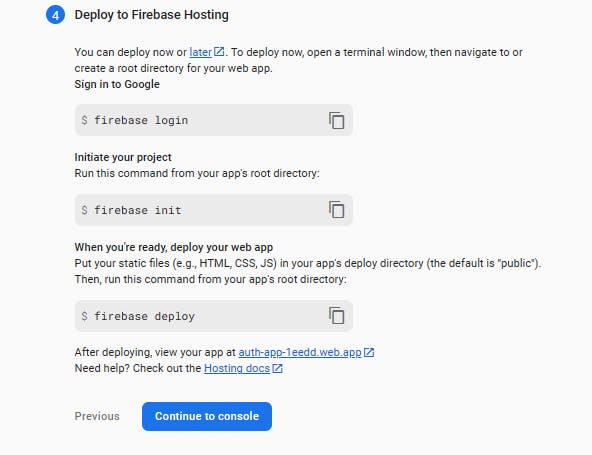
- Here we will be able to deploy our app, but since this is not needed for this tutorial, press the
continue to consolebutton
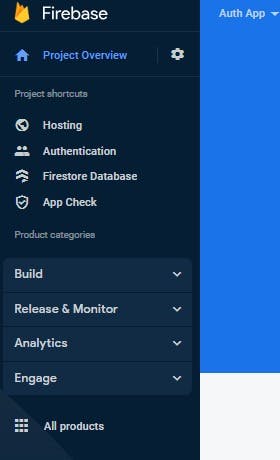
Getting Started With Authentication
So Now after following the process, you will be taken to your project overview page, go to the sidemenu and you will see this image below.
Make sure to click on build and you will see authentication, Now click on authentication and you will be navigated to the authentication page:

Next, Press the set up sign-in method button to authenticate and manage users from a variety of providers:

After doing that, you will be given list of providers to add your sign-in method with
For this tutorial, you will be using Google and email/password as your provider.
Adding Google provider
First, Click on the google provider button

Now, Click on the
enablebutton to ensure you put your Public-facing name for your project and provide your support email. Next, Click on thesavebutton at the bottom.
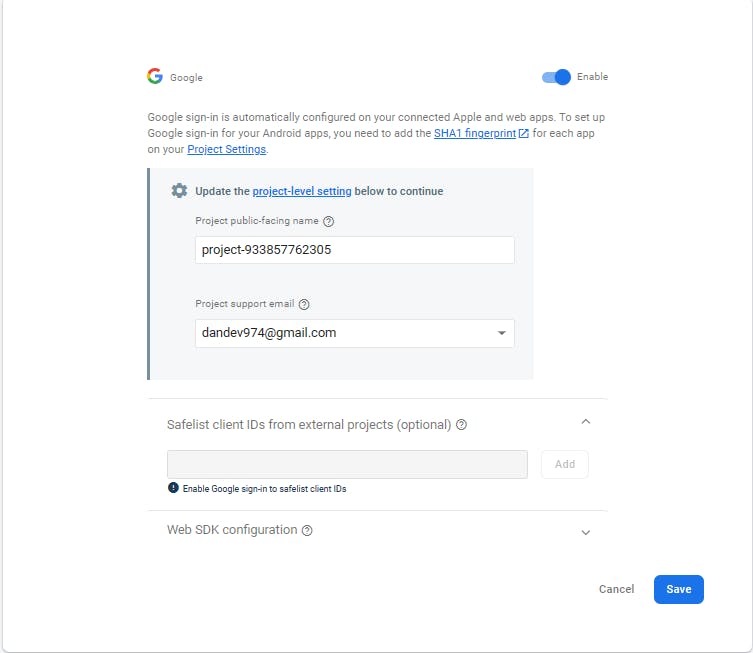
Here you have successfully enabled the google Provider for authentication.

Adding Email/Password native providers
After enabling google Provider, follow this steps to add email/password Providers
1. Click on the add new provider button.
Next, Pick Email/Password as the next Provider:

- Enable for only Email/password and not Email link and then click save to continue the Process
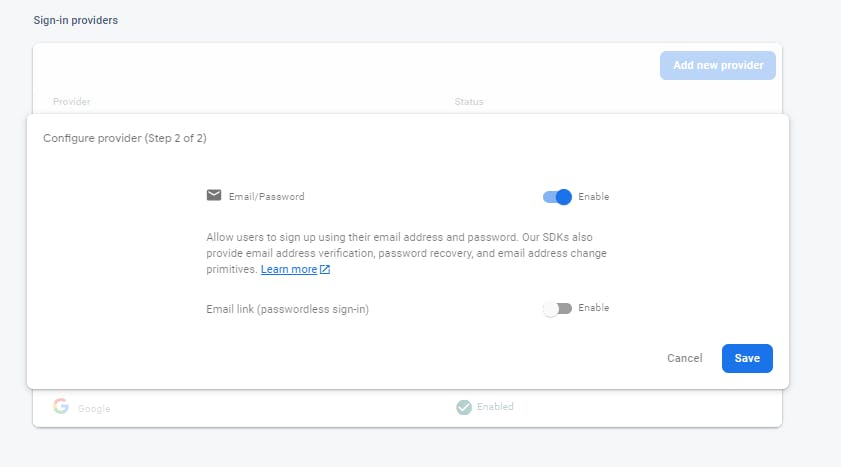
Congratulations, you have also successfully added email/password Providers

Configuring authorized domains
Why is it important?
When you use a custom domain with Firebase, you need to reconfigure authorized domains to allow secure communication between your domain and Firebase services.This ensures that your custom domain can interact with your Firebase project's resources.
Firebase won't work properly with your domain without adding your custom domain to the authorized domains list. So, it's a necessary step to make everything work smoothly and securely!
Here are the steps to create a custom domain
Go to the settings tab and click on Authorized domains

Next, click on add domain and put
127.0.0.1as the custom domain since our React app is on porthttp://127.0.0.1:5173and then press add to save the custom domain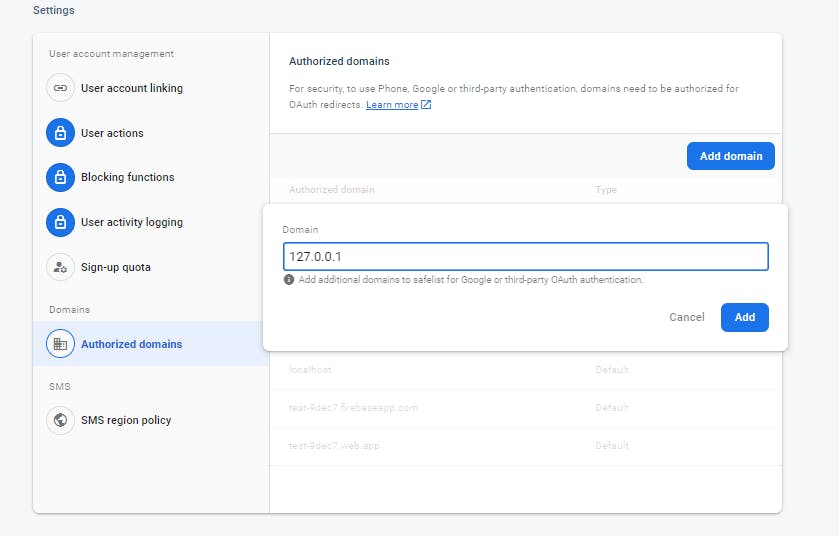
After adding, we successfully set up custom domain authorization.
What is Cloudstore ?
Cloud Firestore is a scalable and flexible NoSQL database provided by Firebase, a Google Cloud service. It is designed to store and synchronize data in real-time for iOS, Android, and web applications.
Enabling CloudStore
1. Click on Build and then on Firestore Database on the left-side menu

- Next , Click Create database

- Now this modal shows after, you are expected to start in test mode. The test mode is more permissive, allowing all read and write operations, which helps during the development and testing phase. Now Press Next to start in test mode.

Here, Set your cloud firestore location
Next, Press enable to complete the Process.
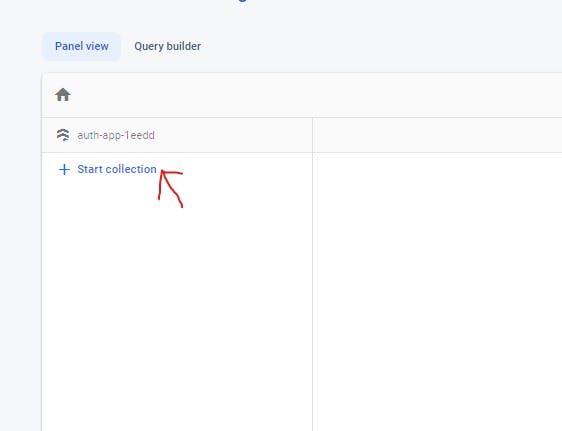
Creating a collection for the document
After setting your Cloud firestore location, follow these steps to create a collection where you store your data:
- Click Start collection like in the image below:
- Make sure you put in your collection ID name which is the specified name for the collection and press next

- After creating a name for your collection, press the auto id button so that you get your Document ID by default.
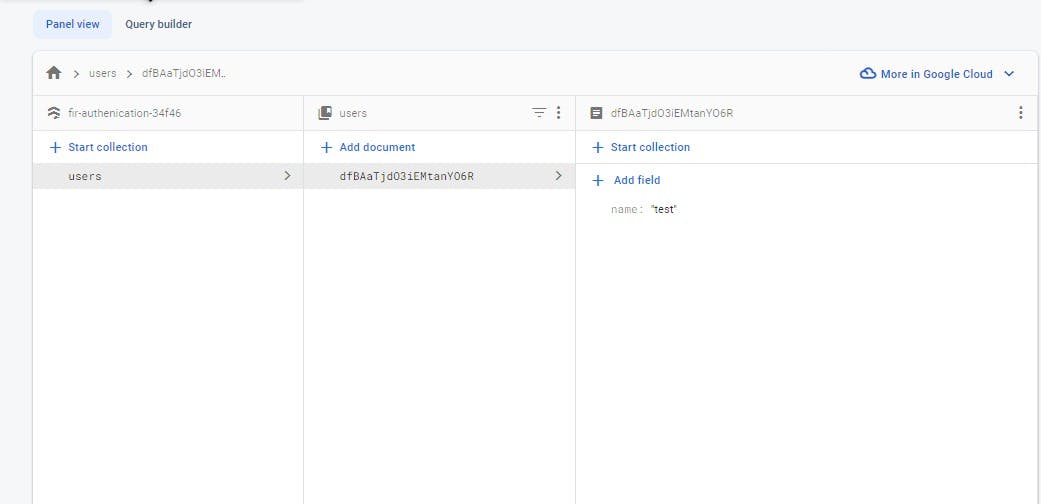
Next, create your first document by putting a key in your field and then giving it a value:

- After that, click save and your database is ready to go.
Finalizing the App Authentication
Now, Go back to your config.js fille in your src folder where you have your SDKs:
//config.js file
// Import the functions you need from the SDKs you need
import { initializeApp } from "firebase/app";
import {getAuth} from "firebase/auth"
import {getFirestore} from "firebase/firestore"
const firebaseConfig = {
  apiKey: "AIzaSyDK3AMzW3KgtR0dTOxwF6a5FiiOdUN3m6k",
  authDomain: "auth-app-1eedd.firebaseapp.com",
  projectId: "auth-app-1eedd",
  storageBucket: "auth-app-1eedd.appspot.com",
  messagingSenderId: "933857762305",
  appId: "1:933857762305:web:f461dbf6bf14cf38ca7400",
  measurementId: "G-YM6PQ3XPMJ"
};
- After importing your functions from the SDKs, you stiil have to initialize firebase and cloud firestore into our project. To do that, copy these block of code into the
config.jsfile
// Initialize Firebase
export const app = initializeApp(firebaseConfig);
export const auth = getAuth(app);
export const db = getFirestore(app); // Initialize Cloud Firestore and get a reference to the service
Next, Create a
context.jsfile .it is assumed you have a basic knowledge of useContext hook in react.
A context file is, where you create a React context and a central place where you define the data that you want to share across components in your application.
you will share functionalities created across your app that simply help you to login in with Google, log in with an email and password and sign up with an email and password.
Here is an example of a basic context.js file
//context.js file
import React, { useContext } from "react";


const AuthContext = React.createContext();// Creating a context in React

export const AuthProvider = ({ children }) => {
  return <AuthContext.Provider value={"data"}>
    {children}
  </AuthContext.Provider>;
};

export const useGlobalContext = () => {
  return useContext(AuthContext);
};
Let's break this down
- The
AuthProvidercomponent is responsible for providing the data to consuming components It takes a "children" prop, which represents the child components that will receive the context data
export const AuthProvider = ({ children }) => {
  return <AuthContext.Provider value={"data"}>
    {children}
  </AuthContext.Provider>;
};
- The
useGlobalContextcustom hook, which simplifies consuming theAuthContextdata in components. Components can use this hook to access the data from theAuthProvider
export const useGlobalContext = () => {
  return useContext(AuthContext);
};
So we go to our main.js file and we import our AuthProvider which you will be using to wrap your App like this:
import React from 'react'
import ReactDOM from 'react-dom/client'
import App from './App.jsx'
import './index.css'
import {BrowserRouter} from "react-router-dom"
import { AuthProvider } from './Context.jsx'
ReactDOM.createRoot(document.getElementById('root')).render(
  <React.StrictMode>
  <AuthProvider>
  <BrowserRouter>
    <App />
  </BrowserRouter>
  </AuthProvider>
  </React.StrictMode>,
)
Inside your context.js file, you will create your authentication functions inside your AuthProvider which will help you to sign in to the users page using your Google account, then log in using your email and password and sign up with your email and password.
googleSignin function
The googleSignin function facilitates Google sign-in for users using Firebase Authentication. If the user signs in successfully and is not already registered in the Firestore "users" collection, it creates a new document with the user's information. If the user is already registered, it does not create a duplicate entry. This function helps manage user authentication and registration using Google sign-in a Firebase-powered application:
//our googleLogin Function
    const googleLogin = async() => {
    try {
        const provider = new GoogleAuthProvider()
         const response = await signInWithPopup(auth, provider)
        const user = response.user
        console.log(user)
        const userRef = (collection(db, "users"))
        console.log(userRef)
        //Cloud Firestore provides powerful query functionality for specifying which documents you want to retrieve from a collection or collection group.
      if(user) {
        const querySnapShot =  query(userRef, where("uid", "==", user.uid))
        const userInfo  = getDoc(querySnapShot)
        if (userInfo.docs.length == 0) { // meaaning if the user doesn't exist on the document
            await addDoc(collection(db, "users"), { // Hence, Create user with the parameters
              uid: user.uid,
              name: user.displayName,
              email: user.email,
            });
          }

      }
    } catch (error) {
        throw new Error(error)
    }

}
loginEmailAndPassword function
The loginEmailAndPassword function is an asynchronous function that handles the login process using email and password with Firebase Authentication:
// loginEmailAndPassword function
 const loginEmailAndPassword = async (email, password) => {
    try {
       const response = await signInWithEmailAndPassword(auth, email, password)
       console.log(response)
    } catch (error) {
        throw new Error(error)
    }
}
signUpEmailAndPassword Function
The signUpEmailAndPassword function is a part of the user registration (sign-up) process in a web application that utilizes Firebase Authentication and Cloud Firestore. The purpose of this function is to allow users to create an account using their email and password.
 //signUpEmailAndPassword function
 const signUpEmailAndPassword = async (name, email, password) => {
    try {
    const response = await createUserWithEmailAndPassword(auth, email, password)
    console.log(response.user)
    const userRef = collection(db, "users")
    console.log(userRef)
     if(!user) {
     const newUser =  await addDoc(userRef, {
       uid: user.uid,
        name,
        email: user.email,
        auth: "",
        password: user.password
       })
       return newUser
     }
    } catch (error) {
        throw new Error (error)
    }

}
After creating the functions, pass them as a value to the Authcontext that helps in sharing them across the App:
        return <AuthContext.Provider value={{
            googleLogin,
            loginEmailAndPassword,
            signUpEmailAndPassword
            }}>
           {children}
        </AuthContext.Provider>
 }
so the context.js file finally look like this:
import { auth, db} from "./confg";
import {GoogleAuthProvider,signInWithEmailAndPassword, createUserWithEmailAndPassword, signInWithPopup} from "firebase/auth"
import {getFirestore,query,collection, where,addDoc, getDoc, getDocs} from "firebase/firestore"
import {useNavigate} from "react-router-dom"
import React, {useContext} from "react"


const AuthContext = React.createContext()

 export const AuthProvider = ({children}) => {
    const googleSigin = async() => {

    try {
        const provider = new GoogleAuthProvider()
         const response = await signInWithPopup(auth, provider)
        const user = response.user
          console.log(user)
        const userRef = (collection(db, "users"))
        console.log(userRef.firestore)
        const querySnapshot = await getDocs(userRef);

        querySnapshot.forEach((doc) => {
          console.log(doc.id, "=>", doc.data());
        });
        //Cloud Firestore provides powerful query functionality for specifying which documents you want to retrieve from a collection or collection group.
      if(user) {
        const querySnapShot =  query(userRef, where("uid", "==", user.uid))
        const userInfo  = getDoc(querySnapShot)
        if (userInfo.docs.length == 0) { // meaaning if the user doesn't exist on the document
            await addDoc(collection(db, "users"), { // Hence, Create user with the parameters
              uid: user.uid,
              name: user.displayName,
              email: user.email,
            });
          }

      }
    } catch (error) {
        throw new Error(error)
    }

}

  const loginEmailAndPassword = async (email, password) => {
    try {
       const response = await signInWithEmailAndPassword(auth, email, password)
       console.log(response)
    } catch (error) {
        throw new Error(error)
    }

}

 const signUpEmailAndPassword = async (name, email, password) => {
    try {
    const response = await createUserWithEmailAndPassword(auth, email, password)
    console.log(response.user)
    const userRef = collection(db, "users")
    console.log(userRef)
    if(!response.user) {
     const newUser =  await addDoc(userRef, {
        uid: user.uid,
        name,
        email: user.email,
        auth: "",
        password: user.password
      })
      return newUser
    }
    navigate("/user")

    } catch (error) {
        throw new Error (error)
    }

}
        return <AuthContext.Provider value={{
            googleLogin,
            loginEmailAndPassword,
            signUpEmailAndPassword
            }}>
           {children}
        </AuthContext.Provider>
 }

export const useGlobalContext = () => {
    return useContext(AuthContext)
}
Implementation inside the login component
Inside your login component, make all the necessary imports
import { useGlobalContext } from "./Context"
import {useNavigate} from "react-router-dom"
you copy this block of code inside your login function:
 const [email, setEmail] = useState("")
  const [password, setPassword] = useState("")
  const [error, setError] = useState("")

//we call the useGloblalContext function and import our functionalties
  const {googleLogin, loginEmailAndPassword} = useGlobalContext()

  const navigate = useNavigate()
Here are the things to note in the implementation:
usestateholds the value for the email, password and errorconst [email, setEmail] = useState("") const [password, setPassword] = useState("") const [error, setError] = useState("")useGlobalContextis called so that you have access to your googleLogin and loginEmailandPassword functionalities.
const {googleLogin, loginEmailAndPassword} = useGlobalContext()
when the
useNavigatefunction is called, it helps you navigate to the users page when you login successfully.const navigate = useNavigate()
After you handle the form inputs and button click, this is how your layout for the login component should look like :
import React, {useState, useEffect} from "react"
import { auth, db} from "./confg";
import { Link } from "react-router-dom"
import {useNavigate} from "react-router-dom"
import {FaGoogle} from "react-icons/fa"
import { useGlobalContext } from "./Context"
import {useAuthState} from "react-firebase-hooks/auth"
export default function Login() {
const {googleLogin, loginEmailAndPassword} = useGlobalContext()
const [user] = useAuthState(auth)
const navigate = useNavigate()
    const [email, setEmail] = useState("")
    const [password, setPassword] = useState("")
    const [error, setError] = useState("")
const Login = async (e) => {
e.preventDefault()
try {
if(!email && !password) {
setError("Fill in all details")
}
await loginEmailAndPassword(email, password)
} catch (error) {
setError("There is error logging in")
throw new Error (error)
}
}
const handlerGoogleLogin = async (e) => {
e.preventDefault()
try {
const response = await googleLogin()
console.log(response)
navigate("/user")
}
catch (error) {
throw new Error(error)
}
}
useEffect(() => {
let TimeoutId
if(error) {
TimeoutId = setTimeout(() => {
setError("")
},2000)
}
if(user) {
navigate("/user")
}
return () => {
clearTimeout(TimeoutId)
}
},[error, user])
return (
<>
<div className="flex min-h-full flex-1 flex-col justify-center px-6 py-12 lg:px-8">
<div className="sm:mx-auto sm:w-full sm:max-w-sm">
<span className="text-red-300">{error}</span>
<h2 className="mt-10 text-center text-2xl font-bold leading-9 tracking-tight text-gray-900">
Sign in to your account
</h2>
</div>
<div className="mt-10 sm:mx-auto sm:w-full sm:max-w-sm">
<form className="space-y-6">
<div>
<label htmlFor="email" className="block text-sm font-medium leading-6 text-gray-900">
Email address
</label>
<div className="mt-2">
<input
id="email"
name="email"
type="email"
value={email}
onChange={(e) => setEmail(e.target.value)}
className="block w-full rounded-md border-0 py-1.5 text-gray-900 shadow-sm ring-1 ring-inset ring-gray-300 placeholder:text-gray-400 focus:ring-2 focus:ring-inset focus:ring-indigo-600 sm:text-sm sm:leading-6"
/>
</div>
</div>
<div>
<div className="flex items-center justify-between">
<label htmlFor="password" className="block text-sm font-medium leading-6 text-gray-900">
Password
</label>
<div className="text-sm">
<Link to="/reset" className="font-semibold text-indigo-600 hover:text-indigo-500">
Forgot password?
</Link>
</div>
</div>
<div className="mt-2">
<input
id="password"
name="password"
type="password"
value={password}
onChange={(e) => setPassword(e.target.value)}
className="block w-full rounded-md border-0 py-1.5 text-gray-900 shadow-sm ring-1 ring-inset ring-gray-300 placeholder:text-gray-400 focus:ring-2 focus:ring-inset focus:ring-indigo-600 sm:text-sm sm:leading-6"
/>
</div>
</div>
<div>
<button
type="submit"
onClick={Login}
className="flex w-full justify-center rounded-md mb-4 bg-indigo-600 px-3 py-1.5 text-sm font-semibold leading-6 text-white shadow-sm hover:bg-indigo-500 focus-visible:outline focus-visible:outline-2 focus-visible:outline-offset-2 focus-visible:outline-indigo-600"
>
Sign in
</button>
<button
type="submit"
onClick={handlerGoogleLogin}
className="flex w-full justify-center items-center gap-5 rounded-md bg-[#FFF] px-3 py-1.5 text-sm font-semibold leading-6 shadow-sm focus-visible:outline focus-visible:outline-2 focus-visible:outline-offset-2 focus-visible:outline-indigo-600"
>
Sign in with google
<span className="text-blue-600"><FaGoogle/></span>
</button>
</div>
</form>
<p className="mt-10 text-center text-sm text-gray-500">
Don't have an account?{' '}
<Link to={"/Register"} className="font-semibold leading-6 text-indigo-600 hover:text-indigo-500">
Register Here
</Link>
</p>
</div>
</div>
</>
)
}
implementation for the signUp component
You do all the necessary imports, just like it is done below:
import { useGlobalContext } from "./Context"
import {useNavigate} from "react-router-dom"
Now copy this block of code inside the login function:
const navigate = useNavigate()
   const {signUpEmailAndPassword} = useGlobalContext()
  const [name, setName] = useState("")
  const [email, setEmail] = useState("")
  const [password, setPassword] = useState("")
  const [error, setError] = useState("")

  const registerAccount = (e) => {
    e.preventDefault()
    if(!name | !email | !password) {
        setError("Kindly Fill in all details")
        return;
    }
       const success = signUpEmailAndPassword(name, email, password)
       if(success){
        navigate("/user")
      }
  }

  useEffect(() => {
    let TimeoutId
    if(error) {
      TimeoutId = setTimeout(() => {
        setError("")
    },1000)
    }
    return () => {
      clearTimeout(TimeoutId)
    }

  },[error])
Here are the things to note in the implementation:
The
usestateholds the value for the name, email, error and password.const [name, setName] = useState("") const [email, setEmail] = useState("") const [password, setPassword] = useState("") const [error, setError] = useState("")useGlobalContextis called so that you access the signUpEmailandPassword functionality.
const {signUpEmailAndPassword} = useGlobalContext()
useNavigateis what helps you to navigate to your users page after users signUp .
const navigate = useNavigate()
- The
registerAccountfunction helps in checking if there is name, email, or password before allowing users to signup.
const registerAccount = (e) => {
e.preventDefault()
if(!name | !email | !password) {
setError("Kindly Fill in all details")
return;
}
const success = signUpEmailAndPassword(name, email, password)
if(success){
navigate("/user")
}
}
- The
useEffecthook helps in clearing up the error state in 1 second if there is error and we pass the error as a dependency.
N.B
Dependencies in the useEffect dependency array [error] indicate that the effect will be re-run whenever the error state change. This ensures that if any relevant data changes (e.g., the user logs in or out), the effect will respond accordingly
useEffect(() => {
let TimeoutId
if(error) {
TimeoutId = setTimeout(() => {
setError("")
},1000)
}
return () => {
clearTimeout(TimeoutId)
}
},[error])
After the implementation and handling of the form inputs, button clicks , necessary methods to sign up the user, here is how your layout for the register component should look like :
import React, {useEffect, useState} from "react"
import { Link } from "react-router-dom"
import { useGlobalContext } from "./Context"
import {useNavigate} from "react-router-dom"
import { useAuthState } from "react-admin"
import { auth } from "./confg"
export default function Register() {
const navigate = useNavigate()
const { registerWithEmailAndPassword } = useGlobalContext()
const [user] = useAuthState(auth)
    const [name, setName] = useState("")
    const [email, setEmail] = useState("")
    const [password, setPassword] = useState("")
    const [error, setError] = useState("")
const registerAccount = (e) => {
e.preventDefault()
try {
if(!name | !email | !password) {
setError("Kindly Fill in all details")
return;
}
registerWithEmailAndPassword(name, email, password)
} catch (error) {
setError("There is error logging in")
throw new Error (error)
}
}
useEffect(() => {
let TimeoutId
if(error) {
TimeoutId = setTimeout(() => {
setError("")
},1000)
}
if(!user){
navigate("/")
}
return () => {
clearTimeout(TimeoutId)
}
},[error, user])
return (
<>
<div className="flex min-h-full flex-1 flex-col justify-center px-6 py-12 lg:px-8">
<div className="sm:mx-auto sm:w-full sm:max-w-sm">
<span className="text-red-300">{error}</span>
<h2 className="mt-10 text-center text-2xl font-bold leading-9 tracking-tight text-gray-900">
Register in to your account
</h2>
</div>
<div className="mt-10 sm:mx-auto sm:w-full sm:max-w-sm">
<form className="space-y-6">
<div>
<label htmlFor="name" className="block text-sm font-medium leading-6 text-gray-900">
Name
</label>
<div className="mt-2">
<input
name="name"
type="name"
value={name}
onChange={(e) => setName(e.target.value)}
className="block w-full rounded-md border-0 py-1.5 text-gray-900 shadow-sm ring-1 ring-inset ring-gray-300 placeholder:text-gray-400 focus:ring-2 focus:ring-inset focus:ring-indigo-600 sm:text-sm sm:leading-6"
/>
</div>
</div>
<div>
<label htmlFor="email" className="block text-sm font-medium leading-6 text-gray-900">
Email address
</label>
<div className="mt-2">
<input
id="email"
name="email"
type="email"
value={email}
onChange={(e) => setEmail(e.target.value)}
autoComplete="email"
className="block w-full rounded-md border-0 py-1.5 text-gray-900 shadow-sm ring-1 ring-inset ring-gray-300 placeholder:text-gray-400 focus:ring-2 focus:ring-inset focus:ring-indigo-600 sm:text-sm sm:leading-6"
/>
</div>
</div>
<div>
<div className="flex items-center justify-between">
<label htmlFor="password" className="block text-sm font-medium leading-6 text-gray-900">
Password
</label>
<div className="text-sm">
<a href="#" className="font-semibold text-indigo-600 hover:text-indigo-500">
Forgot password?
</a>
</div>
</div>
<div className="mt-2">
<input
id="password"
name="password"
type="password"
value={password}
onChange={(e) => setPassword(e.target.value)}
autoComplete="current-password"
className="block w-full rounded-md border-0 py-1.5 text-gray-900 shadow-sm ring-1 ring-inset ring-gray-300 placeholder:text-gray-400 focus:ring-2 focus:ring-inset focus:ring-indigo-600 sm:text-sm sm:leading-6"
/>
</div>
</div>
<div>
<button
type="submit"
className="flex w-full justify-center rounded-md bg-indigo-600 px-3 py-1.5 text-sm font-semibold leading-6 text-white shadow-sm hover:bg-indigo-500 focus-visible:outline focus-visible:outline-2 focus-visible:outline-offset-2 focus-visible:outline-indigo-600"
onClick={registerAccount}
>
Register
</button>
</div>
<div className="text-sm flex flex-row gap-5">
<p>Already have an account? </p>
<Link to="/" className="font-semibold text-indigo-600 hover:text-indigo-500">
Login
</Link>
</div>
</form>
</div>
</div>
</>
)
}
Implementation for the user component
- Make all the necessary imports:
import React, { useEffect, useState } from 'react'
import {auth} from "./config"
import {useAuthState} from "react-firebase-hooks/auth"
import {signOut} from "firebase/auth"
import {useNavigate} from "react-router-dom"
- Copy this block of code inside your login function:
  const [loading, setLoading] = useState("")
  const [userInfo, setUserInfo] = useState([])
  const[username, setUsername] = useState("")
  const[useremail, setUseremail] = useState("")

  const navigate = useNavigate()

  const [user] = useAuthState(auth)

const fetchSpecificUser = async () => {
      const userRef = collection(db, "users")
      const querySnapshot = query (userRef, where("email", "==", user?.email))
      const doc = await getDocs(querySnapshot)
      const {name, email} = (doc?.docs[0]?.data())
      setUsername(name)
      setUseremail(email)
    }

  useEffect(() => {

    if(!user) {  // -> if no user exists
      navigate("/")
   }

      fetchSpecificUser()

      let intervalId
      if(!username){  // if no username exists
        intervalId = setTimeout(() => {
           fetchSpecificUser()
        },5000)
      }
  },[user, username, loading, setLoading])

  const handleSignOut = async() => {
    await signOut(auth)
    navigate("/")
  }
Here are the things to note in the implementation:
- The
usestateholds the value for the loading, userInfo, username, and userEmail state.
  const [loading, setLoading] = useState("")
  const [userInfo, setUserInfo] = useState([])
  const[username, setUsername] = useState("")
  const[userEmail, setUseremail] = useState("")
- The
useNavigatefunction is called when we need to redirect back to our login page
const navigate = useNavigate()
we call the useAuthstate function while passing auth as it's only parameters, to get the user data from firebase.
const [user] = useAuthState(auth)
The
fetchSpecificUserfunction is an asynchronous function that fetches specific user data from a Firebase Firestore database based on the user's email. Here's a brief explanation of what the function does:- It first creates a reference to the "users" collection in the Firestore database using
collection(db, "users").
- It first creates a reference to the "users" collection in the Firestore database using
    const fetchSpecificUser = async () => {
          const userRef = collection(db, "users")
      }
- Next, it creates a query to retrieve documents from the "users" collection where the "email" field matches the email of the current user (
user?.email). Thewherefunction is used to specify the condition for the query. It then executes the query and awaits the result usinggetDocs(querySnapshot), which returns aQuerySnapshotcontaining the matching documents
    const fetchSpecificUser = async () => {
          const userRef = collection(db, "users")
          const querySnapshot = query (userRef, where("email", "==", user?.email))
          const doc = await getDocs(querySnapshot)
        }
The function then extracts the
nameandemailfields from the first document in the query result (if any) usingdoc?.docs[0]?.data(). The optional chaining (?.) is used to handle cases where the query might not return any results or if there's an error, it sets thenameandemailvalues retrieved from the document.const fetchSpecificUser = async () => { const userRef = collection(db, "users") const querySnapshot = query (userRef, where("email", "==", user?.email)) const doc = await getDocs(querySnapshot) const {name, email} = (doc?.docs[0]?.data()) setUsername(name) setUseremail(email) }
The
useEffecthook checks if no user exists before updating the loading state, here let look at what the useEffect does:- This condition below checks if there is no user currently logged in. If
userdoes not exist, then there is a redirect back to the login page. But if there is a user, thefetchSpecificUser()function is invoked.
- This condition below checks if there is no user currently logged in. If
useEffect(() => {
if(!user) { // -> if no user exists
navigate("/")
}
fetchSpecificUser()
},[ user, username, loading, setLoading ])
- Here the code checks if
usernameexists, indicating that the username data hasn't been fetched yet or is not available. If so, it sets up a timeout usingsetTimeout. After 5 secs, it invokesfetchSpecificUser()again. This means that if the username data is not available initially, the component will re-fetch the user data after a short delay.
useEffect(() => {
if(!user) {
navigate("/")
}
fetchSpecificUser()
let intervalId
if(!username){ // if no username exists it sets up a timeout
intervalId = setTimeout(() => {
fetchSpecificUser() // it invokes fetchSpecificUser again
},5000)
}
},[user, username, loading, setLoading])
handleSignOutfunction: This function is an asynchronous function that handles the user sign-out process. It calls thesignOutfunction from the Firebaseauthmodule to sign the user out. After successfully signing out, it uses thenavigatefunction to navigate the user to the login page
const handleSignOut = async() => {
await signOut(auth)
navigate("/")
}
Dependencies in the useEffect dependency array [user, username, loading, setLoading] indicate that the effect will be re-run whenever any of these variables change. This ensures that if any relevant data changes (e.g., the user logs in or out), the effect will respond accordingly.
After the implementation and handling the user, loading state, form inputs, button clicks, and necessary methods to sign up the user, here is how your layout for the user component should look like :
import React, { useEffect, useState } from 'react'
import {auth, db} from "./confg"
import {useAuthState} from "react-firebase-hooks/auth"
import {signOut} from "firebase/auth"
import {useNavigate} from "react-router-dom"
import { collection, query, where, getDoc, getDocs } from 'firebase/firestore'
const User = () => {
const [loading, setLoading] = useState("")
const [userInfo, setUserInfo] = useState([])
const[username, setUsername] = useState("")
const[userEmail, setUseremail] = useState("")
const [user] = useAuthState(auth)
const navigate = useNavigate()
useEffect(() => {
   const fetchSpecificUser = async () => {
       const userRef = collection(db, "users")
       const querySnapshot = query (userRef, where("email", "==", user?.email))
       const doc = await getDocs(querySnapshot)
     const {name, email} = (doc?.docs[0]?.data())
       setUsername(name)
       setUseremail(email)
     }
if(!user) {
navigate("/")
}
fetchSpecificUser()
let intervalId
if(!username){
intervalId = setTimeout(() => {
fetchSpecificUser()
},5000)
}
},[user, username, loading, setLoading])
  const handleSignOut = async() => {
    await signOut(auth)
    navigate("/")
  }
return (
<div className='flex flex-col justify-center items-center border border-[#e2e0e0] mx-10 mt-10 lg:mx-[250px] py-10'>
<div className='flex flex-row justify-center items-center gap-6'>
<p>Logged in as <span className='text-blue-500 font-bold'>{username ? username : "loading"}</span></p>
{user?.photoURL ?
<img className='rounded-[100%]' src={user?.photoURL} alt='image'/>
: ""
}
</div>
<button className='bg-blue-500 rounded-md px-3 py-2' onClick={handleSignOut}>
Sign Out
</button>
</div>
)
}
export default User
Implementation for the reset component
Make you do all the necessary imports:
import { useState, useEffect } from "react";
import { auth} from "./config";
import { useGlobalContext } from "./Context";
import {useNavigate, Link} from "react-router-dom"
import {useAuthState} from "react-firebase-hooks/auth"
Inside your reset function, copy this block of code:
  const [email, setEmail] = useState("");
  const[error, setError] = useState("");

  const [user] = useAuthState(auth);
  const navigate = useNavigate();
 const {sendPasswordReset} = useGlobalContext()

  const handleReset = async (e) => {
    e.preventDefault()
    try {

      if(!email) {
        setError("Fill in the detail")
      }
      await sendPasswordReset(email)
      alert("Password reset link sent!, check your email");
      navigate('/')

    } catch (error) {
         setError("There is error resetting your password")
        throw new Error (error)
    }
}
  useEffect(() => {

    if (user) navigate("/user");

  }, [user]);
Here are the things to note in the implementation:
- The
usestateholds the value for the email and error
  const [email, setEmail] = useState("");
  const[error, setError] = useState("");
we call the
useGloblaobalContexthook to gain access to our sendPasswordReset functionalityconst {sendPasswordReset} = useGlobalContext()we call the
useAuthstatefunction while passing auth as it's only parameters, to get the user data from firebase.
const [user] = useAuthState(auth);
The handleReset function is the asynchronous function that helps you to reset our password. inside your handleReset function, you have your try block where you set the error state to "fill in the detail" if there is no email. But If there is email, you call the sendPasswordReset function while passing your email as the only parameter and then you navigate back to your login page. While in your catch block, set the error state and then throw the error if any:
  const handleReset = async (e) => {
      e.preventDefault()
      try {

        if(!email) {
          setError("Fill in the detail")
        }
        await sendPasswordReset(email)
        alert("Password reset link sent!, check your email");
        navigate('/')

      } catch (error) {
           setError("There is error resetting your password")
          throw new Error (error)
      }
  }
Now after the implementation, here is how your layout for the
resetpage will look like:
import { useState, useEffect } from "react";
import { auth} from "./confg";
import { useGlobalContext } from "./Context";
import {useNavigate, Link} from "react-router-dom"
import {useAuthState} from "react-firebase-hooks/auth"

export default function Reset() {

const {sendPasswordReset} = useGlobalContext()

  const [email, setEmail] = useState("");
  const[error, setError] = useState("");

  const [user] = useAuthState(auth);
  const navigate = useNavigate();

  const handleReset = async (e) => {
    e.preventDefault()
    try {

      if(!email && !password) {
        setError("Fill in the detail")
      }
      await sendPasswordReset(email)
      alert("Password reset link sent!, check your email");
      navigate('/')

    } catch (error) {
         setError("There is error resetting your password")
        throw new Error (error)
    }
}
  useEffect(() => {

    if (user) navigate("/dashboard");

  }, [user]);

  return (
    <div className="flex min-h-full flex-1 flex-col justify-center px-6 py-12 lg:px-8">
          <div className="sm:mx-auto sm:w-full sm:max-w-sm">
          <span className="text-red-300">{error}</span>
            <h2 className="mt-10 text-center text-2xl font-bold leading-9 tracking-tight text-gray-900">
              Reset your account
            </h2>
          </div>

          <div className="mt-10 sm:mx-auto sm:w-full sm:max-w-sm">
            <form className="space-y-6">
              <div>
                <label htmlFor="email" className="block text-sm font-medium leading-6 text-gray-900">
                  Email address
                </label>
                <div className="mt-2">
                  <input
                    id="email"
                    name="email"
                    type="email"
                    value={email}
                    onChange={(e) => setEmail(e.target.value)}
                    className="block w-full rounded-md border-0 py-1.5 text-gray-900 shadow-sm ring-1 ring-inset ring-gray-300 placeholder:text-gray-400 focus:ring-2 focus:ring-inset focus:ring-indigo-600 sm:text-sm sm:leading-6"
                  />
                </div>
              </div>
                <button
                  type="submit"
                   onClick={handleReset}
                  className="flex w-full justify-center rounded-md mb-4 bg-indigo-600 px-3 py-1.5 text-sm font-semibold leading-6 text-white shadow-sm hover:bg-indigo-500 focus-visible:outline focus-visible:outline-2 focus-visible:outline-offset-2 focus-visible:outline-indigo-600"
                >
                 Reset
                </button>
            </form>

            <p className="mt-10 text-center text-sm text-gray-500">
              Don't have an account?{' '}
              <Link to={"/Register"} className="font-semibold leading-6 text-indigo-600 hover:text-indigo-500">
                Register Here
              </Link>
            </p>
          </div>
        </div>

  )
}
Conclusion
In this article, you have learned how to implement routes in your react app, style your app with tailwind css, authenticate your react app with firebase, implemented a backend feature using cloud firestore. You can learn more about firebase from the official documentation. If you have any questions, Contact me on Twitter: @Lord__Codex.